Monday, September 29, 2008

YOUR Girlie Hair Dos Show-Off Day


You guys have been VERY BUSY!! I have been loving all of your nice comments, chatting with you in e-mail, and seeing all of your fun ideas and pictures!! Today I wanted to show off some of the cute hairstyles you have done. I can't keep these to myself!

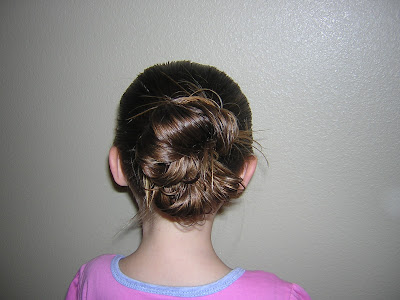
The mom who sent in this style and I were laughing because our daughters have "twin hair." The texture, color and length are almost identical. And even stranger.....I have a style almost identical to this one sitting in my hair folder. Too Weird!!
Anyway, for this style: Do a pull through above the pony, then space the elastics all the way down and do a pull through in between each of the elastics. I love this idea, very quick and very cute!! I should have passed this one off as my own, no one would have known the difference, right?


Next we have a couple of adorable sisters. Notice what a great job their mom did on the woven piggies and the heart!! TOO CUTE!!

Obviously this mom has some major hair skills. Here's a few more from her........ I especially love this picture with the puppy, how sweet!
Have you EVER seen anything cuter than this? I've got to go get some bright green bows!

Next, we have the woven tiara......with bangs!! This is one of my favorite styles. It's so fun to see it on another princess.

These next pictures make me wish my daughter was still little....kinda!! Look at this amazing transformation with the before and after, WOW!

Alright, I think that's it for today. Thank you so much for sharing your cute girls with me. I'm really enjoying the time my daughter and I have spent together working on this fun little hobby. I hope you're all enjoying it too. I've got some fun new styles coming up that I'm excited to post. Also, another giveaway is in the the works, so watch for that!!

Friday, September 26, 2008

Messy Bun Video For Long Hair


I've had a few requests for a messy bun video. There really is no exact science to doing these. I normally just do whatever works for the day. This is the method I use most. I've found that the longer my daughter's hair gets, the harder these are to do. If your little girl's hair is shorter, you should only have to do one loop, leaving the ends on top instead of on the bottom. If you are working with even longer hair, just keep adding elastics, looping the ends as many times as you need to, all the way around the bun.

And, you'll have to forgive me, this isn't the best video. This is one of the few styles I actually prefer doing on dry hair. Of course her hair is dripping wet, straight out of the bath here. Hopefully it will give you the basic idea.
Here's the end result.............
messy bunI think everyone has their own way of doing these. Hopefully you'll find a method that works for you!!

Wednesday, September 24, 2008

Sewn Braid Headband With a Messy Bun


I love the simple look of having a headband with a pony or piggies. But, my daughter will not leave the headbands alone! She loves to take them on and off and by the time the day is over, it's a complete mess. So, here's my solution. More time consuming, yes, but really cute too.

Start by making a pony, leaving out some hair underneath. Split the hair underneath into 2 sections and add some elastics. It's not going to be seen once you make your messy bun, so it doesn't really matter how it looks under there.

Braid both of the sections and lay them over the top of her head. Position the braids where you want them and add a clip to keep the braids together and temporarily anchored to her head.
Starting on one side, at the bottom (under the pony) sew the braid onto her hair the same way I did it with this hairstyle. Once you get to the point where the braids meet, tuck the end of the other braid underneath and keep sewing. When you get past the elastic of the other braid, you'll need to bring the ribbon through both braids to hold them together for a couple of stitches. Like I am doing here........
Sew all the way to the other side, positioning the braid as you go. When you get the the bottom, tie the ribbon in with the elastic and make your messy bun.

If your little girls hair is on the thinner side, I would recommend doing the stitches diagonally for a better hold. Also, if you have time, you could sew it twice, making the second stitches slanting the opposite way, forming X's all the way across. This would hold it really well. Make sense?


If your little girls hair is long enough, you could do one braid going all the way around. Or if it's shorter, start the braids up by the ear. That will give you an extra couple of inches on each side.

Monday, September 22, 2008

Twisted Knots Tween Hairstyle


I have wanted some cute flowers for my daughter's hair for the longest time. I've tried to make them myself, but I'm really bad at it. I LOVE these!! If you want some of your very own, I happen to know where you can get them.....Go straight to Angela's Accessories boutique.

For the style: Start by parting out 3-4 sections and do a twisting braid in each one. I did 4. In the top section I did a pull-through. (If you don't know how to do a twisting braid or a pull through, look under my "quick search labels" for "videos." You'll find instructional videos there!)

Tie each of the braids into a knot, at the very top (by the elastic) and pin with some bobby pins. Send the ends hanging down alternating sides.
Here's the finished product. Ok, I LOVE these flower clips!


This style would be ok on its own. But, the flowers make it SO much cuter. If you are in need of some cute new hair accessories, go check out Angelas Accessories.
Now, here's a little lesson on what to do when church starts in 10 minutes and you haven't even thought about hair...........I took out yesterday's style (the one at the top of this post) pulled it all into a side pony, made a little loop at the top, and let the snakes from the twist braids hang freely. This would normally look like a complete disaster, but Angelas Accessories saved the day with another cute clip! Even some of my worst attempts at doing hair can look cute with the right bow!
And a little side note: I don't know what the makers of these clips have done differently, but all 3 of these stayed in ALL DAY! I've tried some in the past that slip right out almost immediately. These are honestly the best ones I've tried for staying put. So, go check out Angelas Accessories, you won't be disappointed!

Friday, September 19, 2008

Picture Day Hair-Hairstyle For Pictures!!


The princess had Kindergarten Picture Day recently. I wanted to do something with her hair mostly down, to capture the length, but still done. This is nothing new or exciting, just simple and sweet..........

The night before, I put her wet hair in some medium sized braids all over her head to give it some curl. The morning of, we took the braids out, made a diagonal box on top of her head and french braided.


Tuesday, September 16, 2008

We've Been Knotty!!!


This post is to show a few of the MANY things you can do with knots. I have a few more knot styles sitting in my hair folder. But, I'm saving them for another time. (I wouldn't want you to get knot overload!!) And, a little note: I put these pictures in smaller than usual because there are a lot of them. If you want a larger view, just click on a picture to enlarge it.

This first pic is showing how to hold the knots tight while you work on the rest of your style. In the past, I've stopped right here and pulled all these ends together into a pony or half pony and finished. That would be a quick variation to try.

Or you can keep going..........

I did these the same way you would normally do elastic braids, just with knots instead. And, instead of making a bunch of parts and adding hair as I went, it's basically just sitting on top of the hair not attached. (Until I secured it in with the pony.)

Here's another variation. On this occasion, I used elastics to keep the knots tight while I worked. This makes it a lot easier, but I don't really like the look of the elastics showing either.

So, I clipped them out! I used our cheap elastics that always break anyway, so it wasn't a total loss. I never would have done this with our "good ones."


These actually both looked much cuter in person. I'm not the greatest photographer, but you get the idea. Right? If you're not sure how to do these, visit my labels for knots. I've tried to explain them before. Or-Now that I know how to do videos....... if you have any requests for something to be shown in a video, let me know. (Within reason of course, I only have like 60 seconds before it cuts me off.)

Monday, September 15, 2008

Snake Bun Hairstyle


It's been one of those mornings. I went to fix something on my sidebar and accidentally erased my links! So, I had to type them all back in......so annoying.

Anyway, here's the other half of the 2-for-1 I promised you.

This one actually happened by accident. I was taking out this style and noticed that after I took out the twisting braids, her hair had these snakes in it. Of course I had to take full advantage of it! I just smoothed out the top and pulled everything into a low pony. Then, carefully made a bun with the little snakes by not pulling the hair all the way through the elastic. If your little girl's hair is on the longer side like ours is, you can do what I did and pull the hair halfway through the elastic twice, making two loops. (Does that make sense?)

Just make sure when you do the first style you do it with the hair really wet, or you won't get the snakes when you take out the braids. And, be careful when you're taking the braids out. Just gently pull the two strands apart from each other with out combing them out.


Of course, if you didn't want to do this style. You could just do a ponytail with some small, wet, twisting braids to get the same look.

Friday, September 12, 2008

Twist Braid Video


I had a request to make a video showing how to do a twisting braid. So, here's my first video ever! Have at it......... There are several different ways of doing these, you'll just have to figure out what works best for you. I know some people twist the 2 strands all the way down first and then twist them together. I've found it's easier for me to twist them as I go. Also, it really helps to do these when the hair is wet, otherwise you'll most likely have little hairs popping out all the way down.

Thursday, September 11, 2008

Twist And Loop Hairdo


Start with 4 low ponies. Make 2 twist braids in each one. (Take 2 strands, twist them in the same direction, then twist them together in the opposite direction.) Add elastics to the ends, leaving 1-2 inches at the bottom for spiking later.

Bring the braids up and tuck the ends into the elastics at the tops of the braids. Starting on the left, I pulled both braids in section 1 over to section 2. One braid from section 2 went to section 1. The other braid in section 2 went to section 3. One braid in section 3 went to section 2. The other went to section 4. Both braids in section 4 went to section 3. (It's really not so complicated, I'm just a bad explainer.)
Now you can add some bows/flowers/ribbons and fix the ends with a curling/flattening iron.


If you end up trying this one, I have another style that goes with it (this is a 2 for 1!) I've got a busy weekend ahead of me, so I'll probably be posting it Monday.

Wednesday, September 3, 2008

Woven Piggies


Here's another cute weaving style.

Make some pigtails, leaving out 2 rectangular boxes, one on each side of the part at the crown ..............

Make some sections in the box on one side of the part. Twist them and add them to the pig on the other side.
Do the same thing in the other box. This time weave the sections through the first twists on your way over to the other pig.
Make some messy piggies and you're done!

This took about 20 minutes.