Sunday, January 31, 2010

Ribbon Braids Heart Hair


A fun new Valentines hair style!valentines day hairstyle Using a ribbon as one of the strands, make a braid on each side of her head.
Band the 2 braids together at the back of her head with a clear elastic. (Keep the elastic fairly loose, as you will need room to bring the braids back through it.)
Pull the braids straight up.....
And bring both ends of the braids back down through the elastic to form a heart shape.
Secure the heart with a couple of bobby pins to keep it in place and tie a bow with the ends of the ribbons.heart hairstyle with ribbons
heart braid
heart in hair 
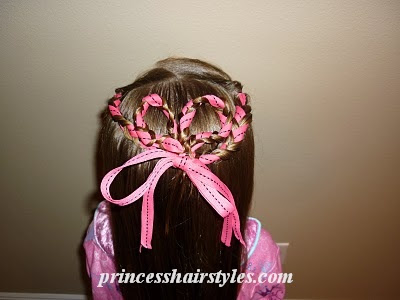
In case you are wondering..... yes, these are her pajamas. Her favorite pajamas actually! She slept with this hairstyle in and we curled the rest of it in the morning. It held up great and saved us time in the morning!little girl hairdo
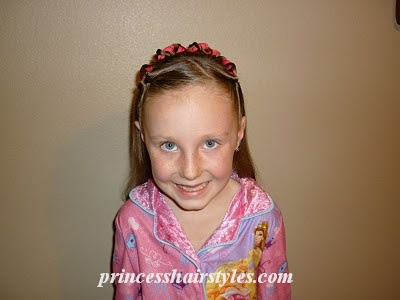
A little warning: You're going to need fairly long hair to do this hairstyle. The Princess's hair is almost to the middle of her back and I barely had enough length to form the heart.

Friday, January 29, 2010

Double Heart Hairstyle


Another fun Valentines hairdo from the past:
double heart hairstyle
Start by making a diagonal part from one side in front of her ear, to the other side behind her ear. Do an upside down pull-through with this section. Split in half, and braid each piece.

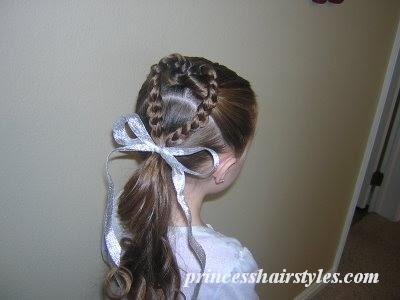
Make another diagonal section below the first one with the ponytail more towards the middle of her head this time.
Do an upside down pull-through in this section as well.
Form a heart with the braids in the first section and band together at the bottom with an elastic. Shove the ends through the middle of the pull-through in the second section until the elastic is hidden. Split the second section in half. Braid each section and form another heart. Bring everything together at the bottom into a side pony.Add a bow if you want. I got this bow here. (It actually matched the first shirt we had on today, not so much now.)
valentines heart hairstyle
double heart hairstyle For a simpler version (which I actually prefer.) Follow the same steps above, just make one heart and 2 sections instead of 3. We did this as a side pony, you could center it and make a regular pony if you prefer. braided heart hairstyle
braided heart
cute little girls hairstyle

Wednesday, January 27, 2010

Heart With Ribbon - Hair Taping


Valentines Day is just around the corner! I thought it would be fun to recycle some of our old Valentines Day Hairstyles and maybe throw in a few new dos from now until Valentines Day.

Here's a heart hairdo post from 2008. A heart with ribbons! The instructions aren't great on this one (it's old) but it's one of our favorites. valentines hairstyle Start by making a half pony. (I went further down on her head than I normally would.) Split the half pony into 2 sections and braid each section. I did rope braids, you can do whatever you like.
Make another pony with the rest of her hair at the bottom.

Take one of the braids and lay it over her head forming half the heart. Secure the end in with the lower pony.

Now you can start on the ribbon. Tie one end onto the elastic. Take a needle and thread the other end through. Start "sewing" the braid right onto her hair. Take the ribbon over the top of the braid, then pull it underneath, grabbing as much hair underneath as you can. When you get to the end of the first braid, just grab the other braid and keep going, forming the rest of the heart. (The ribbon is actually what holds the braid to her head, so make it kinda tight.) And, it probably doesn't even need to be said, but.......BE CAREFUL WITH THAT NEEDLE!!! (Or use a plastic one.) hair taping When you get back to the bottom with the other braid, tie the end into the elastic. You can finish this however you want. We did a messy bun. heart hairstyle
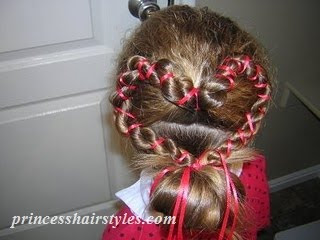
I actually crimped the top of her hair before starting this, just to give it a little more texture.

Sunday, January 24, 2010

Zig Zag Braided Double Ribbon Headband


Wow, these titles are getting a little long hehehe. Anyway, here's the fun variation of our latest do that I promised.hairstyle for girls Part her hair on the side, then part out 2 sections on each side of the part and do some pull throughs in each section as shown.

By the way, some of the steps in this hairstyle could be used as it's own hairdo! It would be darling left just like this. Right?
If you want to keep going; Thread a couple of ribbons through the middle of the pull throughs. These will act as little "holders" so that the ribbons will stay in place. (The ribbons we used were about five feet long and were fairly stiff/thick.) Now you can braid the ribbons into the hair on both sides (4 braids total.) We made these braids look zig-zaggy by splitting the hair into 2 strands and using the ribbon as the 3rd strand in the braid. Try to hold the ribbon flat as you're braiding and loosely braid the hair around the ribbon without letting the ribbon fold or twist. Secure at the bottom with a clear elastic.Again, you could stop right here if you wanted. We actually left her hair down just like this one day and it was so cute!Or, if you would rather.... Pull everything over into a side ponytail and braid the ends the same way we did with the other hairstyle.It's hard to see here, but her hair wasn't quite long enough to go all the way down the ribbon and over to the ponytail on that pink braid. I just tied it off with a clear elastic halfway down the ribbon to keep the hair from unraveling. It really wasn't noticeable. So, if your daughter's hair is on the shorter side, that's an option.
2 headbands
ribbon hair style
braided headband hairstyle
ribbon braidsIs this gross? We loved this one so much she wore it for 3 days! I left the ribbons braided and just touched up the ponytail each day before school with some water and hairspray. Now you know all our secrets!!

Saturday, January 23, 2010

1,000,000 Visitors Contest is Over AND Coins For Comments!


Ok, so the 1,000,000th visitor has came and gone! How exciting!!

I think there were a few too many people refreshing the page at the same time and it confused the counter, lol. It seems that a whole bunch of you were 1,000,0001!!

I did have one person email me the winning screen shot at 1 million though. So.... congrats to Jenni H. (our winner)!!!!! For those of you who are curious, Jenni chose a Walmart gift card for her prize.

Also, my wonderful friend over at Babes in Hairland (out of the kindness of her heart) is donating "coins for comments" to help people over in Haiti. All you need to do is head over to her site and leave a comment on the "coins for comments post." She will donate 10 cents for every comment she receives on that post! (One per day, per person.) So, if you've been looking for a way to help out the people of Haiti but don't have money or time to give, this would be a quick and easy way!! Oh and by the way.... I am going to help cover anything over the $250 she is hoping to donate. So, lets get a whole bunch of comments over there!!!

Have a nice weekend everyone!

Wednesday, January 20, 2010

Double Headband Ribbon Braid


I think this has to be one of my new favorite hairstyles. I say that a lot, but this one is just so simple and cute!! I would try it on myself if my hair was long enough.
cute hairstyle Super easy and quick too!

Start by cutting 2 lengths of ribbon. How long the ribbons need to be depends on the length of your daughter's hair. The ribbons I used were about 5 feet long each. Maybe cut them a little longer if you're not sure. You can always trim at the end, but it's hard to add more if you need it! :)

Part her hair on the side and lay the ribbons over her head (leaving about the same length hanging on each side.) Place a temporary bobby pin on either side of the part just to keep the ribbons separated and where you want them for a minute.

Smooth all of her hair over to one side and adding in the ribbons, start braiding. Try to place the ribbons on top while you're braiding so that they show up in the braid. Tie the ribbons into a bow at the bottom if you want to.
cute and quick hair style When you're done braiding you can take the temporary bobby pins out at the top. I ended up adding some permanent bobby pins on each side of the braid in a crossing pattern to keep the ribbons in place and prevent them from sliding around. The bobby pins don't bug me and I actually think they are cute showing. (Just my opinion.)

As you can see, her hair is still dripping wet here. It looked better and cuter when it dried. No time for drying when you have church at 9:00 a.m. though!
I'm thinking this hairstyle would be cute for cheerleading! You could use 2 different colors of ribbon to match the school colors.
double ribbon headbanddouble headband I have another fun, but not so simple variation of this hairstyle ready to post next. (When I find time of course, which most likely won't be for a few days.)

Also don't forget to check our counter when you stop in. We're getting close to having a winner with our 1,000,000th visitor contest!!

Friday, January 15, 2010

How To Do Twists - Another Method


I think most everyone does these little cornrow type twists. We love them and use twists in lots of our hairstyles. I know some people have a hard time with the french twist braid, so this is just an easier way to get the same type of look.
twist hairstyle twist cornrows Part out a row where you want the twist to be and section off a small piece in front of the row.
Using the end of a rat tail comb, start wrapping the hair around it. We have a smaller rat tail comb that I would normally use, but it's gone MIA. I'm guessing it's in with the Princess's doll stuff. :) The thinner the handle of your comb, the tighter the twists will be.

Keep wrapping the hair around the comb while adding sections of hair all the way back.

Keep going until you get to the end of the row.

Slide the comb out of the twist and add an elastic at the end of the row to keep it in place.
Quick and easy!
twist hairstyle Oh, and you may have noticed I've started to add watermarks to our pictures. Due to some "unfortunate events" I've decided I need to do this to help keep my daughter's pictures safe. It's too bad it's come to this, but unfortunately it's not an innocent world that we live in. Hopefully the watermarks won't be too annoying or distracting. But I'm sure any of you with kids would understand why we don't want our pictures taken (as you would want the same courtesy shown to your children.) Thank you!!

Tuesday, January 12, 2010

Braided Twisty Headband


criss cross cornrowsWe actually did this hairdo around the same time we did our African American hairstyles experiment last spring. So, it's been sitting in our folder for awhile. It's basically the criss cross french braid hairstyle on it's side, in the front, headband style.

Start by parting two headband sections like this.... Then, part those sections into 3 sections each. 6 total. Starting in the right front section..... French braid up and over to the back middle section. Then, down to the front left section. (I used inside out french braids or "cornrows." Regular french braids would work as well.)
Next, french braid the remaining sections. Starting with the back right and going to the front middle and ending with the back left.
I ended this by banding together the braids above her ear and adding a cute clippie.
french braid in front
twisted headband
french braid headband
front braidHey, I just noticed she still has her baby teeth here! They are now long gone. sniff
braid headband A reminder: Don't forget about our 1,000,000th page view contest! The page views are slowly but surely creeping up there. I'm guessing maybe in another few weeks we'll have a winner? We will see!!