Tuesday, September 28, 2010
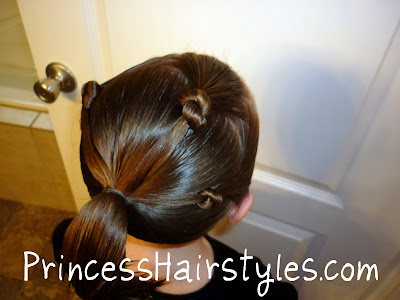
Tween Twists Princess Hairstyle
Here's a fun twist hairdo we did back before Our Princess donated her hair to locks of love. It makes me a little sad to see these pics. Look how long and beautiful her hair was! It does help to know that another little girl just might be a little bit happier because of the donation though. The Princess has mentioned several times now that she hopes the little girl who received her hair is happy with it and wonders what style she might be wearing that day. :)
So anyway, this hairstyle is quick and easy and I thought might be cute for little girls, as well as tweens and teens.....
Start by grabbing a circular section of hair right at the crown of her head. Don't worry about getting the parts absolutely perfect. This hairstyle is meant to be a little bit messy and relaxed. Twist the hair up a little, but not right up against her scalp. You want it pretty loose.
After you get it twisted up, push the twist up towards the front of her head to form a little "poof" and secure with some crossing bobby pins.
Here's what it will look like at this point from the side. As you can see, I left the bangs out of the poofy section on both sides.
Now you can take the hair in the front/sides and start making some twisted sections. Bring the twists over the top of the bobby pins and secure with a claw clip. (Or more bobby pins if you prefer.)
Make as many twists as you want. We did 2 on each side.
And the finished look............
I think these poofy "bangs" gives it more of a grown up look. This hairstyle could maybe even work for Homecoming/Prom or a special occasion.
You could use this same concept using braids instead of the twists if you wanted as well. This only took about 5 minutes! I've had some requests for styles that could be done on yourself. I think this one just might be easy enough for that.
Friday, September 24, 2010
Picture Day Hairstyle
Ok, this hairstyle isn't anything new, unique, or extra special. ;) But, we've had lots of inquires lately about suggestions for hairstyles for picture day. So, I thought I would show you what we did for our picture day hairdo this year, just for an idea.
These pictures were quickly taken as we literally ran out the door for school. :) Kind of a last minute thing, ya know?
This hairdo reminds me a little of this hairstyle by Jenn, which I adore. This would be the picture day/ short version of that one!
As you can see, it's just a square on top of her head, divided into 3 sections. I french braided the back 2 sections and then added the "bangs" into the elastic with the braid in the front. Next, I sewed in the ribbon with our trusty craft needle. And lastly, added a few flat iron curls.
I usually like to leave her hair mostly down for pictures. And something fairly simple/classic as well. Hopefully she won't look back on this picture years from now and hate her hair. LOL I have a few pics from my school days (as I'm sure some of you do as well) with really, really awful hair! We're talking huge bangs, etc. hehehe
Here are a few more hairstyles we've done for school pictures in years past for more ideas: picture day hair 1picture day hair 2picture day hair 3 So, I'm curious. Have you already had your school pictures taken this year? What did you do for the hair style?? Or what do you plan on doing, if it's still coming up?
Labels:
Curls,
French Braids,
Lacing,
Mostly Down,
Ribbons,
Short Hair
Wednesday, September 22, 2010
Topsy Tail Winners.....
Tuesday, September 21, 2010
Fake French Ribbon Braid Video
We posted this quick and easy "fake" french ribbon braid quite awhile ago, but recently had a request to make a video tutorial on it. So, here you go.
This is one of our favorite cheats. :)
This is our short hair version (shown in the video) with double braids on top....
And here are a few more hairstyle ideas I dug up from older posts for you using this same technique:A headband ribbon braid.... One single french ribbon braid down the middle....
And, a single braid using thinner ribbon. (FYI, we've found this holds together better if the ribbon is a little thicker.)
Have fun with this hairdo!
Btw, it's the last day to enter the topsy tail contest if you haven't already. I will post the 3 winners on our giveaway blog and on facebook after I draw them either late tonight or in the morning (depending on when I find the time.)
Friday, September 17, 2010
Tuesday, September 14, 2010
Knotted Twisty Bun
A quick and easy knotted bun. I think this would be a great hairstyle for dance recitals, ballet performances, or other sports. It stays in really well, keeps the hair out of her face, and looks cute besides. :)
We added a few knots in front this time for some added flair. Of course this is optional. But if you want to add the knots like we did here, leave some hair out in front before you make the ponytail....
Then part out a few sections with the hair you left out. We made zig zag parts between the sections just for fun. Tie some knots and add the ends in with the ponytail to keep them secure.
This hairstyle video tutorial is showing how to do the knotted bun itself:
If you have long hair, it works better to make knots in the entire ponytail instead of leaving some hair out like we did in this short hair version. And then instead of leaving the ends out to spike, you could curl them if you wanted for a more elegant and less messy look.
She wore this hairstyle to church one day and soccer practice the next. :)
Friday, September 10, 2010
Braided Bangs - With A Tweek
We both love the look of french braided bangs or a braid in the front of our hairdos. It's one of those quick hairstyles we use a lot on school days. But, I thought it might be fun to try something a little bit different with this basic style to change things up. So.... instead of starting the french braid in it's usual spot on the front/side, I started it in the back this time. Just a small tweek, but I love how it turned out!
To start: Part out a rectangular row about an inch wide where her part would normally be on the side/top of her head and then another part from the row you just made, straight down to her ear.
This is a little awkward :) but have her face you while you french braid starting at the back of her head and continue down the row until you get to the front.
Then have her turn to the side and continue french braiding until you get to her ear. After I made the turn to go across the front, I only took hair from one side to give it more of a round look. If you want to continue taking hair from both sides of the braid, it will finish looking more square, which would be super cute as well. When I got to her ear, I just tied the braid off with an elastic, added the flower, and put the ends in with the ponytail.
Thank goodness for 5 minute hairstyles on school mornings! Otherwise we would be late every day. :)
Labels:
Corn Rows,
French Braids,
Ponytails,
Quick,
Short Hair
Friday, September 3, 2010
5 Strand Ribbon Braid
Is it just me? I love seeing ribbons in hairstyles for little girls! Some of you may have already tried the 5 strand braid that we posted awhile back. This is just a fun way to spice it up a bit. I've also noticed it helps to add ribbons to a braid when you're working with hair that is on the thinner side. The ribbons make the braid look and feel thicker.
Enjoy!
Labels:
5 Strand Braid,
Braids,
Curls,
Mostly Down,
Ribbons,
Videos
Subscribe to:
Posts (Atom)