Showing posts with label Featured Accessories. Show all posts

Monday, May 30, 2011

French Fish Braid Hairstyle, Side Swept


The Sideways Fishtail Braid

We posted a picture of this side swept french fish bone braid here on our blog and on one of our hairstyle ideas videos on Youtube awhile ago. Since then we have received request after request for a video tutorial. Well, here we are almost 2 years later finally getting around to it! :)

This unique looking hairdo is actually pretty easy and uncomplicated (although it is a little more time consuming than a regular french braid.) It also takes a bit to get used to making the braid sideways instead of up and down.

sideways french fish braid
french fishtail braidFor me, this braid is easier to make with wet hair (since the princess's hair is naturally so straight and tends to get flyaways while dry.) But, depending on the hair texture you are working with, you may want to try it dry. If you have naturally curly hair, this would look adorable done with a more tousled, dry, beachy, look. Just do what works best for you!

herringbone braid
fabric flower headbandAnd here's the video tutorial some of you have been asking for..... finally!


Btw, did you notice the adorable headband and flower accessories in these hairstyle pictures? I'm participating in a 3 part series of posts called "Mums The Word-But I Just Gotta Tell Ya" for All Things Ribbon. The fun mom (Jen) over at AllThingsRibbon.com sent myself and 2 of my hair blogging friends (Girly Dos and Babes In Hairland) these darling mums. Each of us are taking a day to post a hairstyle using her adorable creations! I can't wait to see what the other 2 hair bloggers come up with and will add links from this post when they get their hairstyles up so that you can see them too! You may also want to join All Things Ribbon on Facebook where you can keep up with Jen's latest creations and great deals!!

Update:
To see what Girly Do's did with these adorable mums, go check out her triangle curls!
And, click here to see Babes In Hairland cute Figure 8 Braid Side Pony!

Wednesday, May 11, 2011

HANAair Professional Hair Dryer Review


I don't do a lot of product reviews on this hair blog (mainly for lack of time.) But, I couldn't pass this one up! I've been using the same hair dryer for years and it's pretty much on it's last leg. A common occurrence (while using my old dryer) is to be about halfway done drying my hair when it overheats and shuts off! I just really don't have time for it most mornings and it's becoming a huge pain. (I won't mention which brand it is, but I think it cost around $15 at Walmart if that tells you anything.) So.... when I was contacted by Misikko to give this Professional Hana Hair Dryer a try, of course I said yes. I have used several Hair Straighteners from this same brand, so I know how great their products are.

This hair dryer is nothing like my old one. It's probably not even a fair comparison. But, so far I love it so much more.
professional hair dryer reviewMy favorite features are the adjustable heat and air settings. It has 3 heat settings, 2 fan settings and a cold shot button. I don't blow dry my daughter's hair very often, but when I do... she really doesn't like the heat. So the lowest heat setting is perfect for her. I (on the other hand) need some heat to help flatten and straighten my frizzy hair. :)

hanaair hair dryer
From the Misikko website: "This dryer has been Salon tested and Salon recommended since its inception. Inspired by Italian design, the combination of HANAair's strongest AC motor along with its tourmaline lined ceramic heater will dry your hair up to 60% faster maintaining natural shine while promoting healthy luxurious hair."

I wanted to test this dryer out to see if it really would dry my hair faster than my old store brand. My old blow dryer took just under 15 minutes to completely dry my hair.

I was almost shocked at how powerful this dryer was the first time I tried it. It really blows! :) And yes, it was much quicker- only taking 6 minutes!

The Pros:
Quick drying time Long cordAdjustable heat settingsGreat qualityIonic heat that is supposed to be healthier for your hairThe weight and feel of the dryer
The Cons:
Price. This hair dryer is on sale right now for $194.99. I'm a frugal person, so I would have a hard time paying that for a hair dryer. I'm thinking you would need to look at this as an investment in something that would outlast and outperform the cheaper products available and eventually pay for itself over time.So overall, would I recommend this dryer? Definitely yes!

*I was provided a hair dryer for this review by Misikko.com. No other compensation was exchanged. The opinions expressed are my own.

Wednesday, March 23, 2011

Quick Hairstyle | Woven Half Ponytail


A Fancy Half Ponytail

This is the first of several quick and easy hairstyles we'll be posting using a flexi clip. Of course if you don't have a flexi clip, you could accomplish this same woven look with a barrette or a variety of other hair accessories.

This would be a great hairstyle for school mornings since it can be done in under 2 minutes! We just wanted something simple, but unique and pretty at the same time.

fancy woven half ponytailI'm thinking this half-up hair style would be cute for teens, tweens, girls and moms. ;) You could maybe even wear this to a dance or other special occasion of you wanted to.

The video tutorial:


We found the clip used in this video at Lilla Rose. It's a size "extra small" if that helps.

Oh and of course, if you love this clip... we are hosting a giveaway right now. If you would like to enter to win a free Lilla Rose Clip, click over to our giveaway blog.

Wednesday, December 1, 2010

Ribbon Braid Design - Scunci Design Weaver


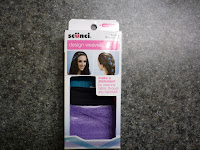
So, we recently got a new "hairstyling toy" from Hair Flair Boutique called the Design Weaver (made by Scunci.) The package includes a hair weaving tool (similar to a plastic needle) and 4 colored ribbons that look a lot like tulle or netting, but glide smoothly through braids and hair.

The weaving tool that comes in this package is nice because the eye is much larger than a regular craft needle (making it easier to thread hair and ribbons through.) If you wanted to do something like this woven basket hairstyle or this quick woven ponytail the weaving tool would really come in handy. :)

These aren't available in stores yet and can only be purchased online. If you click here: Design Weaver it will take you to Amazon, where they are available to purchase.
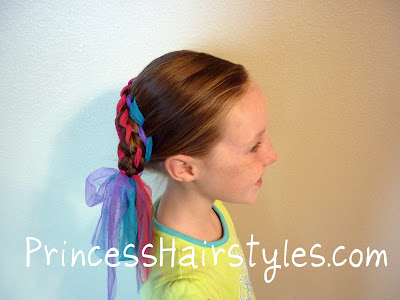
scunci design weaverAs you can see, we've been having lots of fun with this! This wrapped around french braid ribbon design is just one of many hairstyles we've created using this new tool. The Princess has asked for ribbons in her hair almost every day since we got our design weaver package! We'll probably be posting a few more hairstyles we have done with this in the near future, but I won't bore you with all of them. Lets just say, the possibilities are endless! wrap around french braidThis kind of reminds me of a hairstyle you might see at a renaissance faire or festival. renaissance braiding A fun, colorful, princessy version of a side swept ribbon french braid.....renaissaince hairstyle And this is a more elegant, sophisticated, subtle version of basically the same hairstyle......
elegant ribbon braid We also did a french braid going up the back of her head (with the black ribbon) and a messy bun for church. It was gorgeous, but unfortunately I didn't take any pics that day. Anyway, just an idea if you wanted something more elegant or an updo for a teen or tween.
ribbon french braid
ribbon braiding And here are the video instructions to create this fun hair style:
The princess really loved his hairdo. :)

Thursday, March 25, 2010

Elastics To The Side


We are loving these sidewinders because we can do a quick and simple hairstyle like this one, yet when we add them in, it's still different and fun!
hairstyle for little girlsFor the hairstyle: Part out a square on top of her head first. Then part out a section in front and add the first elastic. Add the hair from the first section all the way back. Easy and quick! We added 2 sidewinders (mixing pink and clear) to the ponytail after.
adding beads to hair
hair holders hairstyle My only complaint is: We have had a hard time keeping the sidewinders in without them sliding out. (I'm guessing this is because The Princesses hair is so smooth and straight.) Our solution has been putting an elastic at the bottom of the sidewinder, which works great.

sidewinder hairdo Or, we add some type of a braid to keep the sidewinder from slipping. I recycled the top of this hairdo and used those elastics two days in a row. Hey, school starts early!!
two braids hairstyle
cute girls hair style

Monday, March 22, 2010

Sidewinder Tiara Hairstyle


This hairdo is easy and quick! I didn't even take step by step pics because I figured they aren't needed. :) I made 5 ponytails in the front, split the 3 middle ponies in half, added a 1-inch sidewinder to each strand and combined them together in the back with 4 elastics.
beaded hairstyle hair accessory The sidewinders come in 2 pieces that are twisted together, so you can mix and match colors if you want to. You could either do everything the same color, or combine colors like we did here. tiara hairstyle
banded hairdo I love these because they look a lot like beads but are so much faster and easier to add!Oh and btw, this is the last day to enter our contest to win some free sidewinders. You can go here to enter if you would like!

Friday, April 3, 2009

French Braids And A Messy Braid Bun


Make a box on top of her head. Split it in 2 and french braid both sections in opposite directions.


You'll have to ignore the crown here, LOL. It was a dress-up day at school and of course, she wanted to be a princess (what else?) Sometime soon I'll do a post showing how we got that crown to stay in (just in case someone else here lives with a princess.)

Anyway, make a ponytail and bring the braids from the front to combine with the pony. Make three small braids in the pony, leaving out some ends at the bottom.


Make one more big braid with the rest of the hair in the pony.


Loop 2 of the small braids back up through the elastic on both sides of the big braid, letting the ends stick out.


Now loop the last small braid up through the elastic underneath.


Wrap the big braid around everything, forming the messy bun and secure with an elastic.


K, if you're not playing dress-up. Here it is without the crown and some cute accessories from Every Little Detail instead!


Tuesday, March 10, 2009

This Contest Is Now Closed


This contest is now over, the winner has been drawn.....

Ok, I love giveaways (obviously) and this is a good one! A $20 gift certificate to Flowerz In Her Hair with free shipping! If you're the winner you'll get to choose anything YOU want to spend the 20 dollars on from this adorable boutique. Lots of cute stuff to choose from too! Bows, Bracelets, Headbands, and check out these Funky Flowers! Nope, shouldn't be a problem AT ALL finding something you can't live without.

We got THIS cute flower clip from Flowerz in Her Hair! (I love the bling in the middle.)

Besides the selection and cuteness (is that a word?) of the items, the first thing I noticed about these hair accessories is the amazing non-slip-grip. I tried to take a pic of the back of one of these clips to give you an idea. Not the best picture, but look at this....

See that white strip of "stuff" on the inside of the clip? It helps hold the clip to the hair better than anything I've ever tried. So, for those of you working with fine hair or baby hair, these clips are for you! I did a little experiment and clipped this on to the tiniest little piece of hair I could find (like one strand!) The princess did a little dance on her bed and the clip didn't even move. See, there it is dangling right where I clipped it! Silly picture, yes. But pretty amazing, right?

So anyway I went off on a little tangent. Back to the giveaway! Here's what you'll need to do for a chance to be the winner of the $20 gift certificate and free shipping :

1. Leave a comment telling me who you will be shopping for if you are the winner. (Like a daughter, granddaughter, sister, neighbor, friend, or yourself!)
2. Head on over to Flowerz In Her Hair and tell me one item you will buy with the $20 if you win.
3. Post about this giveaway on your blog.
4. Place a link to this hair blog or to Flowerz In Her Hair on your sidebar. (A separate entry for each link.)

You can do ANY or ALL of the above for up to 5 entries. Make sure to leave a separate comment for each one you complete so that each entry will count for you. I'll be pulling the winner through random.org on Thursday night (3/12.) Good luck!

PS-Don't forget to leave me a way to contact you if you win. An email or blog will do. Thanks!

Wednesday, February 25, 2009

A FREE Giveaway Treat!!! THIS CONTEST IS CLOSED, THE WINNER HAS BEEN DRAWN!!


THIS CONTEST IS NOW OVER
I'm excited about this giveaway! Remember this cute flower bow made from fabric I posted about a few days ago??


I got it from a website I've fallen in love with called The Pleated Poppy. Not only does this shop sell adorable Posy Hair Clips like this one; They sell all kinds of handmade stuff. Everything from Super Hero Capes to Ruffled Aprons!

The Pleated Poppy also has a blog you'll want to check out with some cute tutorials and craft ideas, fun!

I love the uniqueness of these hair clips! I've actually never seen any clips made from designer fabric quite like them. The best part? The Pleated Poppy has generously offered to sponsor a free giveaway for my readers, yipee!!

The winner will receive their choice of a set of 3 Posy Hair Clips!!

Here's what you'll need to do for a chance to win:
I'm allowing several entries per person. You'll get one entry for doing each of these. Please leave a separate comment for each entry so that they'll all count when I draw the winner using random.org on Saturday, February 28th!
1 entry for leaving a comment.....any comment. (I like to make it easy on you lazy ones, LOL) 1 entry for leaving a comment telling me which set of these hair clips you would choose if you are the winner. Besides the hair clips, tell me another item from the store that you would love to have.Spread the word about this contest! And if you were referred by someone, make sure to leave a comment telling me who sent you. Every comment that is left with your name as the referral is another entry for you!
That's it people! Just make sure to leave a way for me to contact you if you win (like a blog or an email address.) Have fun browsing through this fun shop, and good luck!

Oh, BTW... Don't forget about my 100,000th visitor contest either! It's getting close!!

Thursday, February 19, 2009

Diagonal Double Dutch Braids


It's hard to tell from this picture. But this is parted diagonally, from the eye on one side, back behind the ear on the other. Put one side in a ponytail to keep it out of the way. Inside-Out French Braid both sections and join together at the bottom with an elastic. There is an inside out French Braid video on the highlighted link if you need it. (I would recommend turning your sound off while watching the video. I sound like a dork and my explanation isn't helpful AT ALL. Trust me, you'll pick it up better with the sound OFF! LOL)

Make several small braids and band together at the bottom, leaving out some ends.Flip the ends back up to the top and wrap with another elastic.This has to be one of my all time favorite bows. The princess says she looks like a "perfectly wrapped birthday present" with it on. (I agree!) In case you want one just like it, I got ours at All Things Ribbon. (If you end up ordering something while you're there, be sure to type in "myprincess" at checkout for a discount.)


I heart this hairdo, so simple and sweet! And did I mention that I LOVE the bow?? Here's the direct link for the New Flower Stacks Bows from the All Things Ribbon website. And don't pay full price! Enter in "myprincess" for your discount when you're done shopping.

Monday, December 1, 2008

Ribbon French Braid, Christmas Style


This one was done the same way I did this hairstyle. You can go there for more specific instructions. I just wanted to show you how it looks using thinner ribbon.

I braided the pony at the bottom and flipped it back up to the bottom elastic and curled the ends over the top to finish it off.
I got this adorable Christmas bow here.