Showing posts with label Buns. Show all posts

Tuesday, April 19, 2011

How To Make A Messy Bun


A Quick And Easy Messy Bun Hairstyle

Quite honestly, making a messy bun has always been hard for me! I know it sounds dumb because the whole point is that a messy bun is supposed to be effortless. Well, for some reason I've always had a problem making them and have had a hard time finding a technique that will work for me without a lot of struggle.

You may remember we posted a messy bun for long hair quite awhile ago. I'm thinking messy buns are much harder to make with long hair. Ever since the princess got her hair cut, these buns have been much more cooperative for me. :) After some experimenting (and some failures) I think we've finally found a method that seems to work almost every time for us.

Yes, this video is probably not needed for most of you (who I'm sure have been messy bun pros for a long time.) But, if anyone out there struggles with making a messy bun like me... maybe this will help?
messy bunOh, and we found these cute new accessories called Bendini Clips recently. (LOVE them.) They are made by Scunci and come in designs made for little girls as well as teens and adults. These clips can be found online at Hair Flair Boutique (look for "Bendini" on the left sidebar.) I'm not sure if these are available in stores yet or not... I haven't had time to look, but you may be able to find them in stores where Scunci accessories are sold.
messy bun with clipThe messy bun video tutorial:
(This method works best with medium length hair.)

I had big plans for a cute new Easter Hairstyle that I was going to post this week, but I'm not sure I'm going to have time for it. If I don't get around to it, feel free to browse through a few hairdos we have done in the past for Easter Sunday by clicking here: Easter Hairstyles

Thursday, April 14, 2011

Never Ending French Braid Bun


French Braiding, Circular Style

I'm not exactly sure of the "official" name of this braid, or if it even has one. I've seen it done before, but I've never seen the name. So, if you know... please tell us in the comments. :)

We're calling it the Never Ending French Braid Bun because it's hard to tell where the braid starts and where it ends! This could also be called a French Braid crown or a Halo Braid. Well, whatever you want to call it... it's a fun and unique french braid hairstyle that probably isn't done very often!

You could do this hairstyle in several different variations. We actually did a hairstyle using this same concept awhile back in a half ponytail. You can see that one here: Rays of Sunshine Hairstyle.

Here is the hair style using one single braid/bun:
french braided crownOr, you could double the braids up and make french braid pigtail buns!
circular french braidsIn pigtails, this actually reminds me of a Princess Leia Hairstyle. ;)
princess leia hairHere's the video tutorial:

Of course if you wanted to, you could add some flowers or ribbons to this hairdo. I think it would be an adorable Hairstyle For Easter Sunday!

Wednesday, March 16, 2011

Rainbow Bun - Dance Bun With Ribbon


Ballet Bun With Ribbon

Here's a cute and unique hairstyle variation on the standard Ballet Bun from the other day.

hairstyle for dance
I thought this "Rainbow Bun" would be a cute hairstyle for a dance competition or recital. I could also see it working for gymnastics or even a Renaissance Fair.

dance bun with ribbon Or, maybe you are looking for a fun hairstyle for St. Patrick's day or just wanted a bright and colorful new hairdo for spring!
This ribbon bun is easy and actually fairly quick to make. Here's the video tutorial:


Of course with St. Patrick's Day being tomorrow, we would love to see your hairstyles. Feel free to share your St. Patty's Day Do's by posting your pictures to our facebook page!If you are in need of ideas, we have a few here: St. Patrick Day hair ideas


Tuesday, March 15, 2011

The Perfect Ballet Bun


How to make a Ballet Bun

We call this a "Ballerina Bun" or a "Ballet Bun" at our house. I've also heard these buns called Dance Buns, Sock Buns, Donut Buns, Bun Molds, a Chignon, and Figure Skating Buns. I know some people make these with a rolled up sock (hence the name "sock bun") or even with a large scrunchie as a foundation.
doughnut bunWe posted a Cinderella hairstyle awhile back, but I'm thinking this bun could also work for a Cinderella or Tinkerbell hairstyle if you are into the Disney Princess thing!
sock bunI think most everyone has probably made a bun similar to this at some point. But, I thought I would share the technique and tools that seem to work best for us. This updo hair style literally takes 2 minutes to complete and stays in place very nicely. A perfect hairstyle for dance competitions, recitals, ice skating and other performances. I think it looks professional, sleek, sophisticated, and elegant. :)

This technique can be used on short hair, medium length hair, or long hair. If your hair is super long, you probably don't need to use a bun foundation at all though, as your bun would most likely have enough volume on it's own just by twisting the hair around itself.


The bun foundation and hair net used in this video can be found at beauty supply stores, Ebay or on Amazon, here:
Hair Donut
Hair Nets

This quick and easy bun is sort of a pre-requisite to a fun and unique variation we'll be posting later this week for St. Patrick's day/spring. So, be sure to check back!

Tuesday, September 14, 2010

Knotted Twisty Bun


A quick and easy knotted bun. I think this would be a great hairstyle for dance recitals, ballet performances, or other sports. It stays in really well, keeps the hair out of her face, and looks cute besides. :)
bun for dancing We added a few knots in front this time for some added flair. Of course this is optional. But if you want to add the knots like we did here, leave some hair out in front before you make the ponytail....
Then part out a few sections with the hair you left out. We made zig zag parts between the sections just for fun. Tie some knots and add the ends in with the ponytail to keep them secure.
This hairstyle video tutorial is showing how to do the knotted bun itself:
If you have long hair, it works better to make knots in the entire ponytail instead of leaving some hair out like we did in this short hair version. And then instead of leaving the ends out to spike, you could curl them if you wanted for a more elegant and less messy look.
twist bun
messy bun for little girls She wore this hairstyle to church one day and soccer practice the next. :)

Tuesday, June 15, 2010

Sarah Michelle Gellar Inspired Boho Hairstyle


We love the Bohemian Braid hairstyles that are so popular right now. The Princess has requested several "Boho Braid" hairdos we've seen around. But I've had a hard time finding many that will work with her new bob haircut.

Then, we saw this bohemian braided hairstyle on Sarah Michelle Gellar and decided we might be able to make it work...
sarah michelle gellar hairstyle sarah michelle gellar bohemian braid

I didn't make our braids as messy or tossled looking though. I've found that when I try to make things "messy cute" it usually just turns out looking MESSY and not so cute lol. If you want your braids to look more like Sarah's, try braiding textured hair when it's dry, and keep it loose.

So you start by making an inside-out french braid on both sides of her head, in the front. And tie each braid off with an elastic.
Then add some loose curls in the back, for texture. I just used our curling iron and some hairspray to create these curls.
Next I took the top section of the curls (not neatly, just use your hands and kind of grab a section like you are making a half pony) and bring the braids underneath, tying them together with an elastic at the back. As you can see, we barely had enough length to join the two braids together...
Now bring the hair from the top loosely together into a half pony over the braids and add an elastic. Don't worry about making it perfect looking.
We obviously don't have enough length in the back to create a traditional messy bun. So, I just pulled random pieces of hair up and pinned them into place with crossed bobby pins....
There is no exactness to this part. Just keep grabbing chunks of hair and pinning them until you are happy with it! Don't even worry about the bobby pins showing either. It adds to the cuteness in my opinion.
So anyway, here is the end result of our improvised messy bun for short hair!
I really should have taken a picture of this hair style at the end of the day. It ended up looking so cute after she had been playing. It just got cuter and cuter as it loosened up and got messed up a bit.
messy bun for short hair
bohemian braid
bohemian hairstyle
sarah michelle gellar hairdo Btw, unrelated to our little girls hairstyle...... do you love this tutu as much as I do? Details on where it came from and how it was made later on this week!
pettiskirt tutu

Thursday, May 6, 2010

Hairstyles for Dance Competition, Recital


We had a request from Michelle on our facebook page for a dance recital hairstyle. Her dance group will be wearing their hair half up with a piece of fabric used as a headband. How convenient! I didn't even need to come up with anything new because The Princess's dance group uses a headband with their costume this year as well. So, I dug through our dance pictures and this is what I found....
hairstyle for danceThe little girls in the Princess's dance group are told to put their hair up in a bun/hairpiece with the headband. But this style could easily be changed into a half ponytail by only bringing up half of the hair in the back.

I took step by step pictures for this hairstyle one time before a dance review, but half of them got deleted. So, we did it again for school the other day.
Start by making a part from ear to ear and add the headband, ribbon, or piece of fabric. This time we used a ribbon that is tied into a knot underneath her hair.
Part the hair in front on the side. Take the hair on the side where the least amount of hair is, spray it down with some water and twist it up. Now, this is what helps to keep the headband in place..... Grab a little piece of hair from underneath/behind the headband... And add it in with the twist on the other side of the headband. You'll want to twist this hair in fairly tight to keep the headband from moving.
At this point I thought it would be easier to make the ponytail before I did anymore twists. I had my daughter hold the twist I had already done while I put the ponytail in. Important: Before making the ponytail, I made sure to leave out 2 more pieces of hair behind the headband to add to my other twists. (One more on the side and one on top of her head.) You can see the one on the side in this pic. I then temporarily placed the first twist where I wanted it with a couple of bobby pins. (You can see the other piece of hair I left out on top for the next twist in this picture.)
You can now take the section in front and make your next twist. I added these both into the ponytail with an elastic at this point.
If you want the twists to cross over the headband instead of a V like we did with the blue ribbon, just switch the hair you add in with the twists in the back. (Add the twist on the right with the hair behind the ribbon on the left and vice versa.)
Now take all of the remaining hair in the front and make the final third twist (adding in the last strand of hair you left out behind the ribbon) and add to the ponytail with another elastic.
recital hairstyle I took the easy way out and added our "fake hair" to finish off this messy bun. If you want to do a real messy bun, you can check out our messy bun video for long hair.
ballet bun
dance hairdo with headband
dance updo
cute hairstyle for dance You can't really see the hair I added into these twists behind the ribbon, but having it twisted in this way held the headband in place perfectly for school and for dancing! cute headband hairstyle Of course, I need to show this next dance hairdo as well, it's one of our favs. I stole this idea from the mom over at Babes in Hairland! You can click over to her site to see the instructions.
headband hairstyleHope you can find something you like Michelle. Good luck with the recital!

Also, it's the last day to enter our contest for the gift cards to hair flair boutique. 3 winners and not too many entries.... the odds are pretty good!

Friday, March 12, 2010

St. Patricks Day Hairstyles - The Rainbow and Clover


We actually did this St. Patrick's hairstyle 2 years ago! I meant to post it last year and then forgot. It's been sitting in my drafts all this time. :)

I remember experimenting and trying to figure out how to add watermarks on these pictures too. You'll have to ignore our old "hair4myprincess" address on these pics. I'm WAY too lazy to go back and change the watermarks.Anway, this is pretty self expanatory I think. It's supposed to be a rainbow with a pot of gold at the end (since her hair is kind of a golden color lol.) This is a "Princess Original" as it was her St. Patrick's idea!

Just part from side to side, make your elastic connecting braid, and finish off each section before you part out the next section back. Of course, use the same color of elastics on each part of the "rainbow." Pull everything together on the side. I made a messy type bun, as you can see. She wore it in a curly side ponytail the next day, that was cute too. rainbow hairdo See where the orange elastics are? Those were actually supposed to be green like the colors of a real rainbow would be. Well, our green elastics had gone MIA (of all colors to be missing on St Patty's) so orange it was.
st patrick's hairstyle
st. patricks day hairdo Oh and Just a little warning; this hairstyle took awhile! I wouldn't recommend attempting it unless you have a good 30 minutes to spare. We were both tired of it towards the end!! There was something good that came from spending all that time on this though..... She was able to wear it for 3 days and it held up really well. Of course, there is also the clover hairstyle we posted last year. You can find that here: St. Patrick's Hairdo clover hairdo

Thursday, January 7, 2010

The Rose - Beautiful And Quick Hairstyle!


rose hairstyle Make a ponytail on top of her head (with a clear elastic) like this.....

This hairstyle works best for me when the hair is damp. Also, put a little bit of gel or pomade in at the top of the ponytail and run it all the way down to the ends.Next, take the ponytail and start loosely wrapping it around the elastic....Keep going.....Wrap the hair around as many times as you need to, depending on how long (or short) your little girl's hair is. You can either keep going until the ends are all wrapped up, or leave a little bit of the ends out like we did.
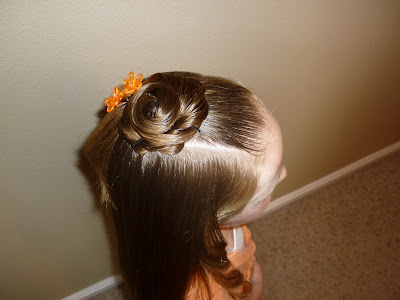
Tighten everything up just a little bit (it should still be fairly loose.) Rearrange things if you need to (so that it's somewhat centered) and smoosh it all down so that it lays flat.Now it's time to bobby pin everything in place. Don't worry about trying to hide the bobby pins. I think they look cute showing a little! We pinned this in 3 spots: The top, at the base where the ends are coming out, and on the right side. At each of these points we used 2 bobby pins (crossing each other for a better hold.) So, 6 bobby pins total. To spice things up a bit, the princess picked out these cute bobby pin flowers to add from Every Little Detail. We also curled the ends under just a bit and added a ringlet to each side of her head.5 minute hair stylequick and cute hairdo
little girl hairstyle with flowers
flower hairstyleIncluding the time for the curls, this took 7 minutes to do. If you leave the curls out, you could probably do it in 5!