Showing posts with label Pull-Throughs. Show all posts

Friday, January 21, 2011

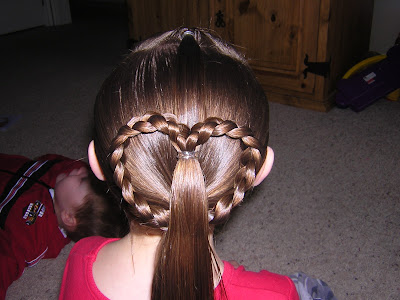
Quick, Easy & Cute Heart Ponytail


Here's a fun Valentine hairstyle that is quick and easy. This one took us 8 minutes and that's including the time it took to curl the pony!

We had a lot of requests for a video back when we first posted this one several years ago (I must have done a really bad job at explaining it lol) so here you are:


And, in case you prefer to follow along by photo: Here's the good old picture tutorial. :)Start by parting out a box in front and do a pull-through. (With or without a topsy tail.)Leaving the end of the pull through out, (you'll need it later to secure the heart.) Make a low pony and do 2 braids with the top half of the hair in the pony.Bring the braids up and position them into the shape of a heart. When you get them the right length on both sides, secure them together with an elastic. You don't want the braids too long or they'll flop around and won't stay put. Also, you need some ends left to add back into the ponytail.At this point, you'll bring the ends from the pony on top down and add them in with the ends of the braids. So, you'll have another elastic over the same place you just put one to tie the 2 braids together, (to secure the heart into place.)braided heartNow, add one more elastic at the base of the pony to keep everything together. If you don't make the braids too long, you won't even need anything to help it keep it's shape. I didn't add any bobby pins or anything and it stayed just like this all day!valentines day hairstyleAdd a bow if you want. I just used some spare ribbon I had hanging around the house and tied a bow with each piece.heart hairstyletopsy tail hairstyleponytail
Wednesday, December 22, 2010

Christmas Hairstyle - Easy


We've had a request for an EASY and quick Holiday Hairstyle that doesn't involve french braiding. I think this one should be doable for everyone!
Christmas Hairstyle Start by making 3 sections in the front.
This step is optional: Make a pull though going towards the top of her head with each of the side sections.
Now thread a ribbon through the elastic on each of the side sections and make sure the ends are the same length. (It may be easier for you to thread the ribbons through the elastics before you do the pull throughs.)
Take the ribbons and wrap them around the ponytails on each side. Then add both side ponytails in with the ponytail in the middle.
Add a cute Christmasy bow and you are done!
christmas hair holiday hair
The Princess thought this hair style would be cute with a candy cane bow. I agree! We might make one IF we get some extra time before Christmas.
christmas hair for little girls
easy holiday hair
easy holiday hair style If you are going to a special holiday party or Christmas program or church and want to take the extra time to curl her hair, you could do that too. :) This Christmas hairstyle took all of 5 minutes!

Friday, July 9, 2010

Double Faux French Braid


Here's the "double fake french braid" tutorial I promised from the other day. It's pretty much the same as our "no french braid floating braid," just taken up a notch....
unique french braidThis is a fun hairdo because just looking at it, people might think it's some type of difficult french braiding. But of course, it's super duper easy! Our little secret!!
cute hairstyle for little girlsOh, and if you want to make a fairytale princess hairstyle with the 2 braids on both sides of her head (like we did in the pictures last time) that would look adorable with these double braids as well.


Enjoy!

If you don't have a topsy tail, you can find one here.

Wednesday, July 7, 2010

"No French Braid" Floating Braid!


I know lots of you have been wanting to try the floating french braid, but haven't yet mastered french braiding. Here's an alternative "cheat" for you! Quick, easy, and absolutely no french braiding required. Hope you like!
floating french braid The how-to hairstyle video.......
And, the picture tutorial:

Begin with an off-center section on top...
Make a braid on each side of her head and connect in the back.
Part the section on top in half.
Starting on either side, take a small section of hair in front and bring it through the braid with a topsy tail. (If you don't have a topsy tail, you can find one here .)
Here's what it will look like with the first section completed. Continue taking sections and bringing them through the braid all the way back on both sides of the part.
The finished "non-french floating braid".....
waterfall braid Of course, we needed to add a cute flower to finish it off. I'm loving flowers in little girls hairstyles lately! So sweet and feminine....hairstyle with flower
fairytale french braid
fairytale braidOh and don't worry, the tutorial for the "double floating non-french braid" shown at the end of our video will be coming soon! :)

Sunday, January 24, 2010

Zig Zag Braided Double Ribbon Headband


Wow, these titles are getting a little long hehehe. Anyway, here's the fun variation of our latest do that I promised.hairstyle for girls Part her hair on the side, then part out 2 sections on each side of the part and do some pull throughs in each section as shown.

By the way, some of the steps in this hairstyle could be used as it's own hairdo! It would be darling left just like this. Right?
If you want to keep going; Thread a couple of ribbons through the middle of the pull throughs. These will act as little "holders" so that the ribbons will stay in place. (The ribbons we used were about five feet long and were fairly stiff/thick.) Now you can braid the ribbons into the hair on both sides (4 braids total.) We made these braids look zig-zaggy by splitting the hair into 2 strands and using the ribbon as the 3rd strand in the braid. Try to hold the ribbon flat as you're braiding and loosely braid the hair around the ribbon without letting the ribbon fold or twist. Secure at the bottom with a clear elastic.Again, you could stop right here if you wanted. We actually left her hair down just like this one day and it was so cute!Or, if you would rather.... Pull everything over into a side ponytail and braid the ends the same way we did with the other hairstyle.It's hard to see here, but her hair wasn't quite long enough to go all the way down the ribbon and over to the ponytail on that pink braid. I just tied it off with a clear elastic halfway down the ribbon to keep the hair from unraveling. It really wasn't noticeable. So, if your daughter's hair is on the shorter side, that's an option.
2 headbands
ribbon hair style
braided headband hairstyle
ribbon braidsIs this gross? We loved this one so much she wore it for 3 days! I left the ribbons braided and just touched up the ponytail each day before school with some water and hairspray. Now you know all our secrets!!

Thursday, February 5, 2009

Double Hearts and a Side Pony


This is a 2 for 1!!

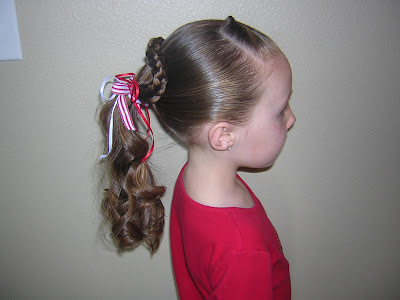
Start by making a diagonal part from one side in front of her ear, to behind the other ear. Do an upside down pull-through (if you don't know how to do that, click on the "video" link under "quick search" to watch the video. It's the exact same thing, just flipping the opposite direction.) Split in half, and braid each piece.Make another diagonal section with your elastic more towards the middle of her head this time.Do an upside down pull-through in this section as well.Form a heart with the braids in the first section and band together at the bottom with an elastic. Shove the ends through the middle of the pull-through in the second section until the elastic is hidden.Split the second section in half. Braid each section and form another heart. Bring everything together at the bottom into a side pony.Add a bow if you want. I got this bow here. (It actually matched the first shirt we had on today, not so much now.)


For a simpler version (which I actually prefer.) Follow the same steps above, just make one heart and 2 sections instead of 3. We did this as a side pony, you could center it and make a regular pony if you prefer.