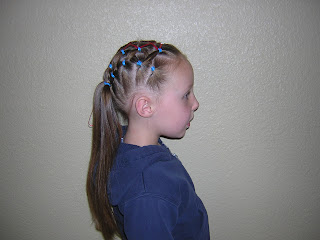
Thursday, July 31, 2008

Tuck and Flip Braid


We wanted something simple and quick today...........This is about as simple and quick as we get around here.


Pull all the hair back into a traditional braid. (Leaving some ends out to "flip" later.)


Poke a hole with your finger through the top of the braid. Then, fold the braid up and through the hole you made. (Behind the braid, not in front.) In this picture, I have pulled the braid up and through. (I'm lifting the ends up, so you can see where the elastic should be.) At this point, I stuck 2 bobby pins through the elastic and pinned it to the back of her head, so that it wouldn't slip out.
Now, you can fix the ends with a flattening iron and spray with hairspray.


Sunday, July 27, 2008

It Can Be Done!!


So, I've had a TON of e-mail lately about my weaving styles. Most of them are from people who "don't get it." I've done my best to answer your e-mailed questions. Hopefully those of you who were having problems have figured it out? If not, I'm sorry! I feel like there's only so much I can explain in words without being able to "show."

These two moms figured out the weaving, then took it up a notch. They were both nice enough to send in some pics to share their talent. I love how these turned out.......
First off, this adorable princess is Sammy. Her mom Ruthanne is very talented with hair, as you can see. Sammy is sporting the Woven Tiara Sammy's Mom then pulled everything back into a pony and did an upside down pull through. I love this!! The next day, her mom took out the weave and pulled the 8 little ponies into a twisting braid. Then, she made 2 pigtails with more twisting braids, made one more in the back, and gathered everything together in a bun on top. This turned out really cute.


Next, we have some adorable weaving submitted by a mom with some MAJOR hair skills....Lori Ann.

Lori Ann did the Woven Tiara in front, going back into some pigtail buns. And, as you can see, she even added some weaving in the back. I think this looks SO cute with those bows. I may have to get some just like it.


Thanks for sharing, girls! I love to see that some of my styles are actually getting used. Keep the e-mails coming!!

Friday, July 25, 2008

Twist, Twist........and Twist


Yikes, this looks kinda scary now that I'm looking at the pictures. It's really not that bad.......Although it did take me 35 minutes. (I timed myself.) So, put aside some time if you attempt this one.

I started with the part down the middle, (like you are making pigtails.) Then, I parted out the two front sections, parted those into 3 sections each, and added the elastics and a twisting braid in each one.

After that, you can start parting the next row. I tried to color each section to better explain this. The pink braids are going to go over to the green ones. (The pink braid closest to the middle part will go to the farthest green one. The furthest pink braid from the center part will go to the closest green one.)

Now, the blue braids will go over to the yellow braids. (The same way you did the first ones, except weave them over and under the braids that are already there.)
If you don't have the time to keep going, it would be cute if you stopped right here.

Or, if you want...................finish off the 3rd row the same way you did the top. (The green braids feeding the purple, and the yellow feeding the orange.)
I had a hard time deciding how to finish this. Too many options! I settled on putting a twisting braid in each section and leaving them hanging. Next time I might do some flippy piggies at the bottom.


You could do this with traditional braids if you wanted. But, in my opinion twisting braids are much faster and SO much easier to take out when you're done. Plus, they look so pretty!

Wednesday, July 23, 2008

Flower Girl Hairstyle, Twisted Up-Do


I think this would be so cute on a flower girl, or for church.

Make 4 or 5 ponies down the middle of her head like so.............. On the bottom pony, I did a pull-through to help finish it off. Now, do a twisting braid in each pony. (Take 2 sections, twist these both in the same direction, then twist them together in the opposite direction.) Put elastics on the ends.At this point, I didn't take any pictures. But, you basically just place the braids on her head, going from side to side, and secure with bobby pins. (Trying to hide the ends.) Here's a side view. And, as you can see, I didn't do the greatest job at hiding the ends. I never notice the little imperfections until I see the pics up on my computer, and at that point it's too late. Oh well, just keeping it real for ya!
I thought this would be cute with some flowers. Of course I didn't have any on hand, so I improvised. You get the idea right? And, just look past all the fly-aways here. This was taken after she had been playing all day long. I'm actually pretty impressed that it stayed in this well.

Tuesday, July 22, 2008

The Rainbow


This fun style was submitted by Candee. It's called "the rainbow" at their house.

To do these adorable waves, Candee used a three-barrel waver which can be purchased at Sallie's or Walmart. Here's a variation of "the rainbow" with her smaller princess.

Aren't these girls just too cute? I LOVE the little dresses they're wearing. Thanks for this wonderful idea Candee! I'm thinking my next "major hair purchase" may have to be the three-barrel waver. Those waves turned out great!

And, if anyone else has an idea they want to show off, keep the e-mails coming! I love to see what can be created on a head of hair!!

Monday, July 21, 2008

Woven Tiara


Well, if you're a follower of this blog, you've probably noticed that I sometimes get stuck on a certain technique. For now, it's "weaving." Here's one more variation, then I'll try to move on to something else.

Make a part down the middle, to the center of her head. Part this into 4 sections (going from the middle part, down to her ear on both sides.) Put the 2 back sections into elastics. Now, part the front sections into as many small sections as you want, and put into elastics. (I did 4 on each side.)
Take all the sections on one side of the middle part, and cross them over to the opposite back pony. (I twisted each strand a little to keep the fly-aways in check.) Add another elastic to secure these in place.

Take all the pieces from the other side and weave them through to the other elastic. (Alternating going over, then under the other strands.) Again, tie them in with another elastic.

My princess got these little plastic bows with a Barbie. They're not my favorite, but she absolutely adores them.

This one was actually really quick, and I think very cute. I'll be using it a lot once school starts. (I won't be getting up 1 minute earlier than I have to.)And, a heads up......Tomorrow I'm going to try to catch up with my e-mail and post some of the wonderful stuff you guys have sent in. So, be watching for that!! I love all the fresh ideas.

Friday, July 18, 2008

Twist and Weave


I just have to say, I think this turned out awesome! Sometimes I have an idea and it turns out just how I envisioned it. Other times, its a complete disaster and I'm too embarrassed to even post it!

This is a fun variation on my weaving braids.................
We're off to a very ugly start! Make two piggies, leaving out 2 sections in the front, and 2 on the bottom. As shown...................
Take a small piece on the bottom, on one side, closest to the part. Twist it up and cross it over to the piggy on the opposite side. Keep going, all the way to the end of her head. (I kept these twists in a little clip by the piggy until I got one side done, then added them all to the pig at the same time, securing with another elastic.) Now, you can start on the other side, with the piece closest to the part. This time, twist, and weave through the twists you've already done, over to the other piggy.
You are now ready to start on the top. Do the same thing, taking the section closest to the part, and crossing over to the opposite piggy.
Weave the other side through, just like you did the bottom. (As you can see, when I secured these with the elastic, I left out a little "ear" to make the buns with.
Twist and wrap the ends around the little ears you made for the buns and wrap with scrunchies. You're good to go!


Thursday, July 17, 2008

Elastic Pony Crosses with Laces


This is another one of our favorites!

I started with the part down the middle. Take it all the way down, like you are making pigtails. Put one side in an elastic while you're working on the other side. I think it makes it easier if you complete one entire side first, then start on the other side. Hopefully you can figure this one out by looking at the finished product, I didn't take pics along the way.

Basically, just make two rows of ponies on each side of the part, crossing and adding the previous ponies all the way down.

I added the ribbon last. Thread it through the elastics, like you are lacing a shoe. Tie a double knot at the bottom, so it doesn't come undone.


I loved this for the 4th of July, with the red, white, and blue. So patriotic!

Wednesday, July 16, 2008

Knotted Headband


Anyone tired of knots yet? I don't know why, but we've been in the knot making mood lately. Tomorrow I'll post something different, I promise!
Make a part from ear to ear. Part out a piece of hair down by her ear and tie it into a knot. Take the extra hair from the knot and tie it in with the next knot. Keep going all the way across her head. For full knot instructions, visit my labels for knots.You'll be left with a piece of hair on one side. You could either leave it hanging and curl it. Tuck it underneath her head and pin with a clip, or pull everything up into a pony or bun. Whatever you want! (We curled it and left it hanging.)