This is a fun and unique braid that I sort of figured out on accident! :) We were doing our knotted french braid hairstyle for school one morning and with just a small tweak, it turned into this.......
 In case you have forgotten what the original knotted french braid looks like, here it is below: As you can see when you compare these 2 braids, they really don't look the same at all. But as you'll notice in the video... they are made almost the exact same way.
 (Sorry about the poor quality of these pics btw. I had pictures of this finished hairdo saved in draft when blogger had it's outage and well, they seem to have disappeared. Of course, I deleted the original pictures off of my card and didn't want to do the hairstyle over. So, I ended up just using a few screen shots of the video for our blog.)
Here's a picture of the back of this hairstyle. We have been loving side ponytails lately and I really like how this braid adds a little something extra to the style.
 Another variation we did with this recently: This hair style was made with the same braiding technique shown in the video below. We just added another braid underneath the first one and took smaller sections to bring the "spirals" or "coils" closer together. There are lots of fun variations and hairstyles you could make with this braid.
 And here's the Spiral French Braid Video Tutorial:
Surprisingly, this hairstyle only takes a few minutes to complete. You can be out the door for school, work or whatever in 5 minutes or less!


 Pull some red ribbon through the elastic of the middle front pony. (Try to make both ends the same length.)
 Split that pony in half and wrap the ribbons around both pieces of hair. Add them in with the 2 outside ponytails in the back. (Use a clip to keep one side from unraveling while you work on the other.)
 Same thing with the 2 outside ponytails, except don't split them. I brought this blue ribbon through the elastic the same way, then used both strands to wrap around the ponytail all in one piece. Add these both to the middle back ponytail.
 If you want to leave her hair down. Stop right here. Just tie the leftover ribbon into bows and you're done! (I added some white ribbon as well just for fun.)
 Or, if you want her hair up, you can keep going. Make 1 more row of 3 ponytails underneath what you already have. Take that middle ponytail and split it in half. You should have 4 blue ribbons in this pony. Take 2 on each side to do your wrapping. Add these in with the 2 outside ponytails beneath. Now you can take the 2 red ponytails on both sides, wrap them up and add them both to the middle.
 Now, make 1 more row (of 3) with all of the hair you have left.
 You could add more ribbons to the last row if you wanted, but I didn't really think it would be seen and I was getting lazy at this point. Split the 2 middle ponytails on the top and bottom, then gather everything you have left on both sides into a set of pigtails to finish.
 Of course, tie the leftover ribbons into bows on the pigtails.


 Start by making a half pony. (I went further down on her head than I normally would.) Split the half pony into 2 sections and braid each section. I did
  When you get back to the bottom with the other braid, tie the end into the elastic. You can finish this however you want. We did a messy bun.
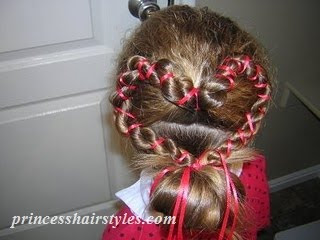
 I actually crimped the top of her hair before starting this, just to give it a little more texture.
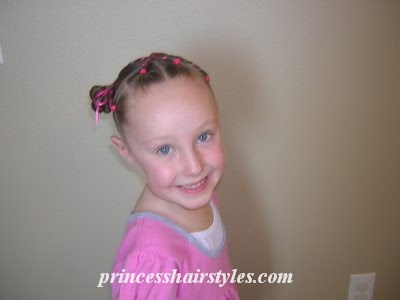 There are tons of different things you could do with these "candy stripes," plus they're easy and quick! Today, we did some weaving.
 Tie some ribbon onto one of the elastics and wrap it around the hair. (I trimmed the end of the knot on the ribbon short and pulled it under the elastic to help hide it.) Wrap all the way down the hair until you can add it to the pigtail on the other side of the part. Add it to the pigtail and trim the ribbon.
 Do this with each section, adding the 2 sections on the right to the pigtail on the left and the sections on the left to the pigtail on the right.....
 Now you can make some buns and add some bows made from the leftover ribbon.

 This is one of her favorites! I like it too.


