I know some of your girls are planning on being a princess, a fairy, Rapunzel, a nice witch or wizard, a barbie, royalty, or maybe a medieval/renaissance type princess for Halloween. I'm thinking this Halloween hairstyle might work with a lot of costumes, actually!
 This princess hair style is relatively easy to make (as long as you know how to french braid) but it does require fairly long hair. These pics were actually taken before our princess got her hair cut.
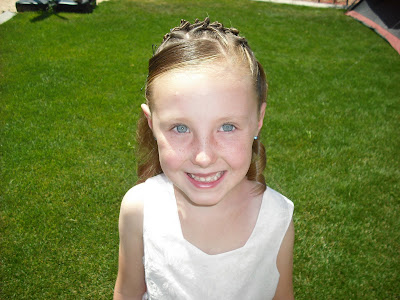
Start by parting her hair down the middle (into pigtails) and begin french braiding one side. As you're braiding- every so often, split one of the strands in half and put that section of hair to the side as you continue on. Braid down as far as you can go. (Btw, please excuse the mess in the background. Although I did try to block out the worst of it for you lol. What can I say? We are normal people. We have kids.... and toys.... and messes. :)
 After you tie off the main french braid, braid each of the sections of hair that you left out as well.
  Now you can french braid the right side as you add in the tiny braids from the left side all the way down as you go. Make sure not to pull the little braids super tight as you add them in so that they form a pretty little swag across her head.
In retrospect, I should have started each tiny braid up a little higher, as the last one doesn't really show.
 There are lots of different ways you could finish this off. I ended up folding the ends of the braids up in half into a fluffy little bun thingy and added a hair accessory at the bottom.
 I love how sweet and elegant this looks.
  This hairstyle almost has an old fashioned/vintage look to it.
 Of course, this one would be lovely anytime, not just for Halloween. This would be a cute hairdo for church, for a flower girl, or other special occasions! I remember doing this hair style one other time and added some flowers and ribbons in with the braids. It turned out darling, but I can't find the pictures. Anyway, you could get creative with it if you wanted to. :) To go along with your Princess costume, my friend Trisha has made instructions showing how to make a fairy wand!


 Here's how......Start by parting out a section in front with 3
  Next, make a half pony under the pull throughs (including the "bangs" in the front.) I added those bobby pins to keep the hair where I wanted it. I think they look cute just as they are, adding some "messy type flair." But if you don't like them, you could put a flower/bow there, or some kind of fancy clip.
 Just another shot of what it should look like at this point.
 Ok, this next part is easier than it looks (I promise!) And there isn't any science to it. Split each of the pull though ponytails in half (6 total) and twist the cRaP out of each piece. When you get each piece sufficiently twisted, randomly clip it somewhere on the half ponytail with a little claw clip.
 Here we are with all the pieces twisted. There's no exactness to this, but I did try to get 3 on each side just for symmetry.
 Now, to hide that elastic. I just took a little piece of the hair in the pony, twisted it, then wrapped it around the elastic a couple times. Tie it off with another clear elastic around the bottom of the twist. (You can see it peeking through on this picture.)
  At this point, I adjusted a few twists that seemed "not quite right" and went to town curling her hair. I just used a regular old curling iron and some generic hairspray to create these curls.


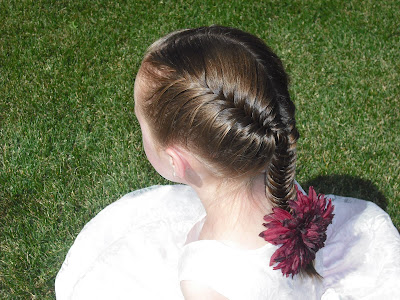 Btw, the princess is really into flowers right now. We got this adorable one from

 Split the half pony in half and
  Make a knot with the braids the same way we did with the other
 Join together at the bottom with an elastic......
 Put a few bobby pins in to keep everything secure.....
 Now you can add a bow and some curls! We got this fun bow from


 Pull all the hair in the back up out of the way. Put some gel in the front sections to keep the hair sleekly in place and using water, comb both sides smoothly, joining in the back underneath with an elastic. (Add the leftover hair from the french braid in with this hair as you bring it back, hiding the elastic up front.)
 Bring the hair back down covering the elastic underneath.
 Now you can either leave it like this for the sleek and straight Barbie look.
 Or you can turn it into a curly Barbie hairdo.
  I prefer to curl it when we leave her hair down because, left straight, it always ends up looking tangled and stringy by the end of the day.


