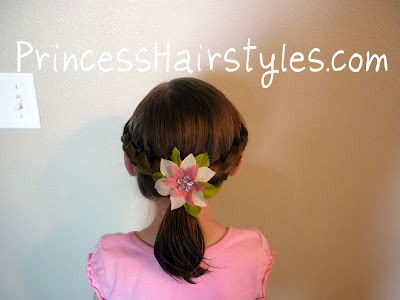
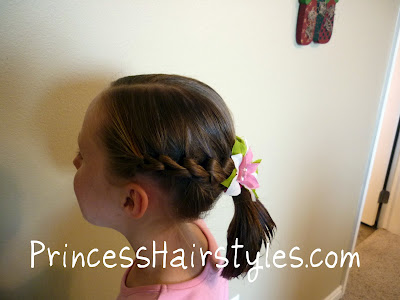
Alright, we're back to chains!! I haven't posted anything with my chains for awhile, so I'm going to do the step-by-step again, to refresh your memory.
Part the hair on the side or middle, whichever you prefer. Pull the hair back into a half pony, leaving out two little pieces of hair on both sides of the part.

Now, I have to apologize for the quality of the next 2 pics. Have you ever tried to take a close-up picture of something with one hand, while doing hair with the other? Enough said....
Anyway, take the 2 strands from one side of the part. Cross them, and tuck one end through the middle like you are starting to tie a knot. Pull this down to the scalp. Do this step again, but don't pull it tight this time, leave a little circle of hair.


Repeat this all the way to the bottom. *I've found a few little tricks to keeping the links nice and neat. First of all, don't make the strands too thick. It works better if you don't have a bunch of hair to work with. Secondly, drench the strands with lots of water, then take a little gel and run it from the root to the tip of each strand before you start.

Make a chain on the other side too, while you leave the first chain hanging.

Bring both chains back to the half pony and tie them in with another elastic.

Add a bow. And of course, some curls.


Now, you may be wondering why I start these chains on the top of her head instead of in the front/side area. I've tried them in the front and it looks cute, but my princess has some baby hairs in this area that are hard to keep under control when they're in chains. If your daughter's hair is thicker, you could probably get away with it.
If you're having problems with this style and need more pics, go
here. The pictures turned out better on that post!
 I love the look of french braids wrapped around the head on both sides (very princess like!) This hairdo has that same basic look, but is much easier and quicker to make in my opinion.
 Not to mention a more unique looking braid than a standard french braid when you are done. :)
 Just in case you are wondering, the cute flower hair clip shown with this style came from Every Little Detail.
 Knotted braid hairstyle for girls video tutorial:


 Now, I have to apologize for the quality of the next 2 pics. Have you ever tried to take a close-up picture of something with one hand, while doing hair with the other? Enough said....
 Repeat this all the way to the bottom. *I've found a few little tricks to keeping the links nice and neat. First of all, don't make the strands too thick. It works better if you don't have a bunch of hair to work with. Secondly, drench the strands with lots of water, then take a little gel and run it from the root to the tip of each strand before you start.
  Make a chain on the other side too, while you leave the first chain hanging.
 Bring both chains back to the half pony and tie them in with another elastic.
 Add a bow. And of course, some curls.
 Now, you may be wondering why I start these chains on the top of her head instead of in the front/side area. I've tried them in the front and it looks cute, but my princess has some baby hairs in this area that are hard to keep under control when they're in chains. If your daughter's hair is thicker, you could probably get away with it.


 Starting on one side, take the two pieces of hair, cross, and tuck one end through the middle (like you are tying a knot.) Pull down to the scalp, as shown. Repeat this step, only this time, don't pull it tight. Leave a circle of hair by keeping it loose. Continue to repeat this, keeping the links of the "chain" the same size all the way down.
 Leave the one side hanging, as shown, while you tie the other side the same way. Then, pull both chains back to the ponytail and secure with another elastic.
 Now, you can make a bun by twisting the hair around itself and wrapping with a cute bow or scrunchy.
 I love these chains! They can be used to make tons of different styles. I'll probably be posting some different variations of it later on. So....stay tuned!