Showing posts with label Headbands. Show all posts

Wednesday, May 4, 2011

Baby Hairstyles - Criss Cross Pigtails


Criss Cross Headband With Pigtails Hairstyle For Babies:

criss cross hairstyle for babiesSince I have about a 1-2 minute window to complete a style on our little Pea before she is done... I don't have time for step by step pics. This is the best I could do!

Make ponytail 1, then directly behind it make ponytail 2. Split ponytail 2 in half and take each half of the hair over to combine on each side with ponytails 3. Lastly, split the hair in ponytail 1 in half and adding the hair from each of those halves with the hair from ponytails 3 on each side, combine everything into ponytails 4 to form the pigtails. Whew!
hairstyle instructions for baby
baby girlNon hairstyle related, but don't you love these chubby little baby arms? :)
cute baby girl hairstyleWe'll have another baby hairstyle ready for you tomorrow, so be sure to check back. In case you missed it, you can find hairdo #1 of our baby hair week here:

Baby Hairstyle - 4 Ponytails


Tuesday, April 26, 2011

Taylor Swift Hairstyle - "Love Story" Updo


Taylor Swift curly updo hairstyle from the music video "Love Story"

Taylor Swift UpdoThe Princess is a big fan of Taylor Swift's music. We happened to see her Love Story video and of course fell in love with her hairstyle in the video! We've been wanting to try it for awhile and finally got around to it this weekend.

At first I tried to place the headband underneath her hair that is swept up and twisted on the sides. (The same way Taylor Swift's hair is in the video.) Well, the headband kind of got lost under all of those curls and was barely visible. :)
Updo with headband hairstyleSo, we ended up moving the headband on top of the hair and more towards the front of her head where it could be seen.

I'm loving this vintage princessy look! Of course, it doesn't look exactly like Taylor Swifts hair, but pretty darn cute either way.
wedding updoI could see this working for a wedding hairstyle for the bride or flower girl. Or maybe a hairstyle for prom or other dance.
taylor swift hairstyle love story
To complete this style, you will need:

Naturally curly hair...... or some curlers or curling iron.
An elastic
Several Bobby pins
A headband, ribbon or other accessory for some added sparkle. (In case you are wondering, we purchased our headband at regular old Walmart. I believe it was made by Goody.)

And here is the video tutorial:
Our princess was so thrilled to have matching hair with her favorite singer Taylor Swift! She said this is her favorite hairstyle so far. ;)

Friday, December 17, 2010

How To French Braid - 4 Strand


You may remember the 4 strand woven braid we posted a few weeks ago. If you figured out how to make that braid, this french braid shouldn't be too hard.

The video tutorial for making this braid is at the bottom of this post. These are just a few ideas for hairstyles that can be made using this french braid.

A 4 strand braided headband with a fake bun:
braided headband with bun We added one of our homemade rosette headbands behind the braid just for fun.
rosette headband For this next hairstyle, I just french braided a small portion in front and ended the braid with a decorative bobby pin from Hair Flair Boutique: front braid with bobby pin And added a messy bun.
messy bun And lastly, another french braided headband with added ribbon and barbie bangs.
french braid headband
ribbon braid headband Here's the tutorial for making the french braid....

I love how intricate and different this french braid looks without being extremely difficult to make. After I posted the regular 4 strand braid, we even had a few moms on our facebook page get one step ahead and figured out how to do make this braid all on their own before I posted this video! Let me know how it turns out if you try it. :)

Tuesday, November 2, 2010

Chain Link Headband Hairstyle


A quick headband hairstyle idea using "chains" for school mornings.....

headband hairstyle
chain link hairstyle We haven't done anything with chains for awhile. Although this is one of our very favorite hair techniques! I love this hairstyle because it's easy, quick, and simple but looks so unique. Every time the Princess has chains in her hair, she always gets tons of compliments.

We've had a few requests for a video tutorial on chains as well, so here you are.......

In case you are wondering, the cute brown/floral headband came from Every Little Detail.For another fun hairstyle idea using these chains, click on this link: Chain link hairstyle - half ponytail

Wednesday, August 18, 2010

Simple And Fancy Headband


A quick hairstyle idea to add some flair to a simple headband and braided bangs......
french braided bangs First make a part from ear to ear. Then, make another small part in her "bangs" on the side. Take the hair/bangs on the side of the part with less hair and brush it to the back. Now place the headband over the part from ear to ear. I should have taken a picture of the other side, but all of the hair on that side should be underneath the headband at this point.This "headband" is actually just a folded stretchy piece of fabric we had from a dance recital outfit that is tied underneath her hair. You could use a ribbon, head wrap, actual headband, or whatever you have available.. Starting at the side part, begin french braiding the front section of hair (only adding hair in from the front.) Every couple of plaits, split the strand next to the headband in half and set one half aside while you continue braiding. Braid down to the end of her hair and tie off with an elastic.
Using some pomade and water, smooth out the leftover strands. Then add in the end of the braid and position everything where you want it to lie. Tie together with a rubber band.
To keep everything in place, add some crossing bobby pins next to the rubber band.
Now you can add a fun flower or bow to finish it off and hide the bobby pins.
quick hairstyle for girls
fancy headband hairstyle
braid with headbandThis hairdo reminds me a lot of the rays of sunshine hairstyle we did before we cut her hair. But instead of adding hair into the braided headband, hair was taken away from the braid this time around.

Tuesday, August 10, 2010

How To Make A Fabric Rosette Headband


We've seen these fun vintage looking fabric flower rosette headbands all over the place lately. The princess and I think they're extremely cute, so we decided to dust off the hot glue gun and give it a try. The princess helped (this is a great craft to do with your girls) and we ended up making quite a few headbands to match some of her back to school outfits. I'm sure they'll come in handy when we need a quick hairstyle for school!
fabric flower headband tutorialIt's actually pretty funny that I'm posting a DIY craft tutorial on this blog. :) I've mentioned this before, but let me remind you that I'm not a crafty person at all. I really dislike sewing and rarely use a glue gun or fabric. So... if I can do this, you can do this for sure! This is a "no sew" method and was actually really easy and quick (even for me, lol.)

Items needed:

scrap fabric
hot glue gun
scissors
felt
pencil
basic headband

Video tutorial 1: How to make a fabric rosette....

Video tutorial 2: How to attach the fabric flowers/bling to the headband.....

Of course, you can get creative with this and make all kinds of cute variations. You could add embellishments such as buttons, beads, feathers, jewels, tulle, lace, etc. You could make the rosettes out of ribbon or you could even make your own basic headband instead of buying one like we did. We made one of these hair accessories using an old pair of jeans for the flowers that turned out to be our favorite headband. If you try this, we would love to see the creations and ideas you come up with! Feel free to inspire us by posting pictures of your finished headbands on our facebook page!!


Tuesday, July 27, 2010

Princess Style Headband - With Rays Of Sunshine!


See the little streamers of hair coming down from this braided headband?
headband braidThis fun hairstyle was actually inspired by a picture of a "ray of sunshine" the princess took all by herself off of our back deck! Do you see the resemblence? (kinda)
ray of sunshine
We both loved how this hairdo turned out. A classic braided princess hairstyle with some added "hair flair." To start: Make a part from ear to ear and pull the hair behind the part into a half ponytail. This step is optional, but I also made another small section in the front and pulled both sides of her "bangs" back together underneath her hair in the back with a clear elastic like we did in our Barbie Hairstyle. Now, this next step is hard to take a picture of, braid, and add hair in all at the same time! (I need a third arm.) But, I started inside-out french braiding (adding in hair only from the front) down by her ear. About every 2 plaits, I grabbed a small section of hair from the half ponytail and added it in with the french braid on the back side. Hopefully this makes sense. The arrows are trying to show you where to take the hair from and add in with the braid lol.
Continue braiding and adding hair from the half ponytail all the way across to her other ear.
What it will look like from the back...
Now you can bring the braid underneath the half pony. At this point if you wanted to, you could bring the braid all the way around her head to the other side where you started the french braid and tuck the ends under the braid with some clips/bobby pins to make a braided crown type of thingy.
Or.. wrap the braid around the ponytail, securing it with a clear elastic at the bottom.
Then of course, add some curls if you want!
braided headband
princess braids hairstyle for a princess

Friday, June 4, 2010

Woven Hair Headband


A fun woven headband hairstyle for a little girl or teen!
hairstyles for little girls Start by making a part from ear to ear and 8 small ponytails. 4 in the front, 4 directly behind.
Take the ponytail in the front/left and make 2 twists. Then split the 3rd ponytail from the left (in the front) in half and make 2 more twists with one of the halves. Combine those 4 twists together with the ponytail 2nd from the left in the back. (With another elastic.) Whew! That sounds confusing even though it shouldn't be. :)
Now take the second ponytail from the left, in the front and split it in half. Make 2 twists with one of the halves and weave them both through your first set of twists over to the ponytail in the back/left. Notice that the first woven twist goes under first then over. The second twist goes over first and then under. Just make sure they are woven through opposite ways.
Make 2 twists with the hair in the ponytail in the front/right. Also take the leftover half from the 2nd ponytail in the front and weave it through the twists in the middle. Combine those 4 twists with the ponytail 2nd from the right in the back.
After that you should just have one half of a ponytail left in the front. Twist it up into 2 pieces and weave it over to the back/right ponytail.
This hairdo really isn't as hard as my instructions have made it sound! Plus it held up for 2 days. Love that! If you wanted to braid the pieces instead of twisting them, you could do that too. I think it would look really pretty. I just like the twists because they are quicker for me.
twisted headband hair headband
woven headband hairstyle I've got another one using this same concept ready to go, only it's much quicker/simpler. I'm hoping to have time to post it next week for you.
Hope you're all having a nice summer!

Thursday, May 6, 2010

Hairstyles for Dance Competition, Recital


We had a request from Michelle on our facebook page for a dance recital hairstyle. Her dance group will be wearing their hair half up with a piece of fabric used as a headband. How convenient! I didn't even need to come up with anything new because The Princess's dance group uses a headband with their costume this year as well. So, I dug through our dance pictures and this is what I found....
hairstyle for danceThe little girls in the Princess's dance group are told to put their hair up in a bun/hairpiece with the headband. But this style could easily be changed into a half ponytail by only bringing up half of the hair in the back.

I took step by step pictures for this hairstyle one time before a dance review, but half of them got deleted. So, we did it again for school the other day.
Start by making a part from ear to ear and add the headband, ribbon, or piece of fabric. This time we used a ribbon that is tied into a knot underneath her hair.
Part the hair in front on the side. Take the hair on the side where the least amount of hair is, spray it down with some water and twist it up. Now, this is what helps to keep the headband in place..... Grab a little piece of hair from underneath/behind the headband... And add it in with the twist on the other side of the headband. You'll want to twist this hair in fairly tight to keep the headband from moving.
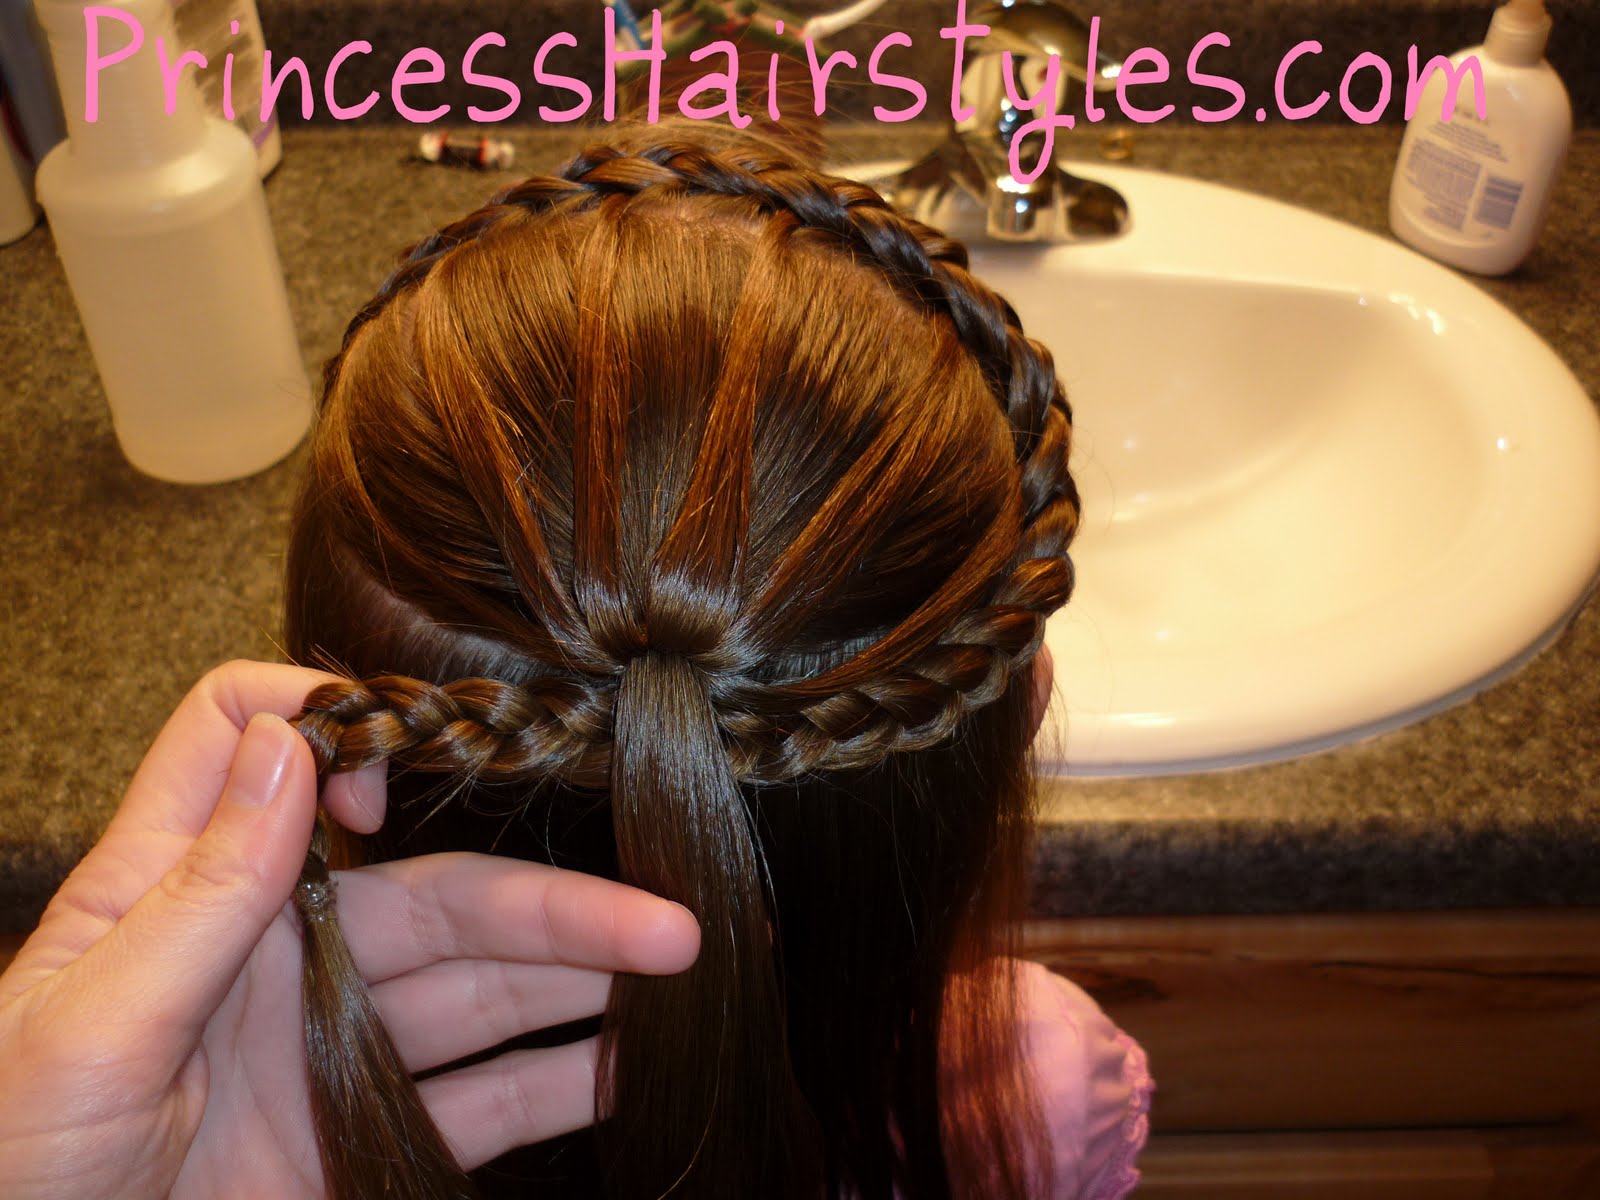
At this point I thought it would be easier to make the ponytail before I did anymore twists. I had my daughter hold the twist I had already done while I put the ponytail in. Important: Before making the ponytail, I made sure to leave out 2 more pieces of hair behind the headband to add to my other twists. (One more on the side and one on top of her head.) You can see the one on the side in this pic. I then temporarily placed the first twist where I wanted it with a couple of bobby pins. (You can see the other piece of hair I left out on top for the next twist in this picture.)
You can now take the section in front and make your next twist. I added these both into the ponytail with an elastic at this point.
If you want the twists to cross over the headband instead of a V like we did with the blue ribbon, just switch the hair you add in with the twists in the back. (Add the twist on the right with the hair behind the ribbon on the left and vice versa.)
Now take all of the remaining hair in the front and make the final third twist (adding in the last strand of hair you left out behind the ribbon) and add to the ponytail with another elastic.
recital hairstyle I took the easy way out and added our "fake hair" to finish off this messy bun. If you want to do a real messy bun, you can check out our messy bun video for long hair.
ballet bun
dance hairdo with headband
dance updo
cute hairstyle for dance You can't really see the hair I added into these twists behind the ribbon, but having it twisted in this way held the headband in place perfectly for school and for dancing! cute headband hairstyle Of course, I need to show this next dance hairdo as well, it's one of our favs. I stole this idea from the mom over at Babes in Hairland! You can click over to her site to see the instructions.
headband hairstyleHope you can find something you like Michelle. Good luck with the recital!

Also, it's the last day to enter our contest for the gift cards to hair flair boutique. 3 winners and not too many entries.... the odds are pretty good!